27 February 2010
A Nice Surprise!
Posted by Carol at Saturday, February 27, 2010 0 comments
Labels: From My Desk
19 February 2010
Gangsta's Paradise
This is a picture I took in Hollywood, California of an awesome Rolls Royce! I've never seen one before , so I just had to snap a photo of it!
Posted by Carol at Friday, February 19, 2010 2 comments
Labels: Layouts
Field of Flowers
This is a picture I took of my daughter Erica at Dow Gardens in Michigan. There were so many beautiful places to take photos , it was hard to decide where to start! They had gorgeous waterfalls, beautiful flower beds and winding trails. If you have a park or a facility in your area that is simply picturesque, make sure to stop and get some pictures. Scenery like this makes a perfect backdrop for senior photos or just family shots!
Posted by Carol at Friday, February 19, 2010 0 comments
Labels: Layouts
14 February 2010
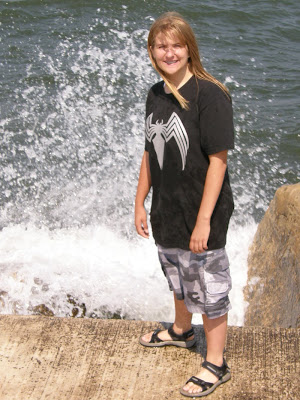
The Wave Whisperer
 I just loved this picture of Erica that I took while camping near Lake Michigan. She looked as though she was talking to the waves, trying to convince them not to get her feet! It didn't work!!
This layout was done using K & Company paper from the Blue Awning line. It happens to be my favorite collection from them. The colors are so easy to work with and coordinate together.
I did a lot of inking on this using Chocolate ink by A la Mode.
The flowers on the right are made using the Retro punch in two sizes,...Whale of a punch and medium,...and are stacked on top of one another for depth. I always outline my flowers with a pen to give them a more defined look.
The letters are printed from my computer using the Beyond Wonderland font and colored in dark blue to match the layout.
I used the Picnik Photo Editing program to color the photo using the Holga-ish effect. I haven't used this effect before, but really liked the way it looked with the blue awning paper.
The white stitching details around the photo are done using a White Gellyroll pen.
Thanks for the visit to Bootscraps!
Posted by Carol at Sunday, February 14, 2010 0 comments
Labels: Layouts
10 February 2010
A Thing of Beauty
 A thing of beauty is a joy for ever:
Its lovliness increases; it will never
Pass into nothingness; but still will keep
A bower quiet for us, and a sleep
Full of sweet dreams, and health, and quiet breathing.
Therefore, on every morrow, are we wreathing
A flowery band to bind us to the earth,
Spite of despondence, of the inhuman dearth
Of noble natures, of the gloomy days,
Of all the unhealthy and o'er-darkn'd ways
Made for our searching: yes, in spite of all,
Some shape of beauty moves away the pall
From our dark spirits. Such the sun, the moon,
Trees old and young, sprouting a shady boon
For simple sheep; and such are daffodils
With the green world they live in; and clear rills
That for themselves a cooling covert make
'Gainst the hot season; the mid-forest brake,
Rich with a sprinkling of fair musk-rose blooms:
And such too is the grandeur of the dooms
We have imagined for the mighty dead;
An endless fountain of immortal drink,
Pouring unto us from the heaven's brink.
This is a poem by John Keats and I found it fitting for this layout. My good friend Jocelyn takes some very beautiful pictures and this is just one example.
I made this layout using paper from K & Company.
I tore and inked the left side and laced it back together using eyelets.
I attached a piece of cardboard to the back to help keep it flat as lacing a page will sometimes cause it to curl up.
I used a flower shaped template to make an outline of dots around the poem. I then added inked and chalked flowers to the petals. A dot of black Scribbles 3D paint in the centers of the flowers finished the layout.
Thanks for stopping by and come back soon!
Posted by Carol at Wednesday, February 10, 2010 0 comments
Labels: Lacing and Stitching
08 February 2010
Making Multi fold Flowers

Hot Glue Gun
Several squares of paper cut 2x2
Ink
Button
Ribbon


Here are some examples of layouts using these flowers!


Posted by Carol at Monday, February 08, 2010 0 comments
Labels: Tutorials
Drivers Seat
 Well, my little girl isn't so little anymore! She turned 16 last September and has started drivers training. Though I knew this day would come, I don't know that my heart was ready for it. I worry constantly about her driving alone .(We still have to ride with her!)
This layout was done using plain black card stock and a pattered piece from K & Company.
I used a circle cut piece of cardboard under the photo for dimension.
The scrolls are hand drawn and I will feature a tutorial on how to make them in the near future.
The letters were printer of the computer using the Bleeding Cowboys font (my favorite!).
Inks are from Autumn Leaves and Ala Mode.
Thanks for dropping in and be sure to come back soon!
Posted by Carol at Monday, February 08, 2010 0 comments
Labels: Layouts
Making a Ruffled Paper Border
Adding a ruffled border to a layout is much easier than it looks! It is such a pretty edge to finish your project beautifully!
What you'll need:
Scissors
Hot Glue Gun
Stapler
Paper


These ruffles can be used on straight lines and on curves. You may have to remove a staple or two to adjust the ruffle where needed.
Here are a few examples using the ruffled border.


Posted by Carol at Monday, February 08, 2010 0 comments
Labels: Tutorials
05 February 2010
Introducing,....CreativeVisualizations!!

Every now and again, you run across someone that is so talented and so inspiring, that you just can't help but admire them.
With my new found interest in photography, I was excited to run across just such a person!
The photo used in this layout was taken by my dear friend John Cusworth. He is an amazing photographer with a gallery full of incredible pictures.
He has been helping me learn the tricks of the photography world, as he was also a teacher at a college in New York. He gives me assignments that are fun, but challenging! I'm learning a lot from him!
He decided he would like to build a blog to showcase his work. I jumped at the chance to help this become a reality. Together, we have spent the last couple of weeks formatting, arranging and assembling a gallery of his work.
I'm so proud to have been a part of this project, and I hope that you will take a moment to check out his blog! It is breathtaking to say the very least!
http://creativevisualizations-jcphotofx.blogspot.com
Thanks for dropping by today and come back soon!!
Posted by Carol at Friday, February 05, 2010 0 comments
Labels: From My Desk
Wish Upon A Star
 This layout was done using K & Company line paper from the Big Best of K & Company Pack. Not really sure which actual pack it's from though.
I used several older elements on this one including the white lacy penned border as shown in my tutorial here....http://bootscraps.blogspot.com/2009/06/this-is-border-i-drew-using-white.html and the rolled roses as shown in the tutorial here......http://bootscraps.blogspot.com/2009/06/two-flowers-one-technique.html.
Posted by Carol at Friday, February 05, 2010 0 comments
Labels: Tutorials
Camping near Lake Michigan
Posted by Carol at Friday, February 05, 2010 0 comments
Labels: Photography


